Finally. The cute little dresses will be hung out to dry.
First, they need a clothes line. I picked something I thought appropriate and appliqued the poles on – but once it was done, the colour seemed wrong. It needs to look rustic. Paint helped. Then I even applied some varnish to keep the colour from bleeding on to the quilt. Chain stitching with crochet cotton completes the line.
Each flimsy little dress is fused with a lightweight knit tricot, and then receives some personalized touches… a belt, buttons, maybe a little embroidery. I could have taken this further, but my patience with the project was waning.
Some final arranging is done. The torn red dress does not make the cut. It will go on the back.
Each dress is appliqued on, and our Circa 1950 quilt is done! Here is the big reveal.
Frontback with label in the middle; note buttons lower left where label can be flipped and attachedfront with hanging label
Backing: I have decided people don’t need to see my stitches, so I fuse multi coloured prints to the back with Wonder Under* or MistyFuse*. Besides a cleaner look, it adds extra weight and stability. I find it is easier to work with, and will hang better in the end.
Piping & Binding: This piece seemed to need something to frame the picture, and balance the dresses. In the end, I decided on piping that was thicker than normal, and binding that was wider than normal.
For the piping, I used shoelaces left over from mask-making days. The binding is a full 2 1/2″, applied the same way as any other traditional binding (cut strips 10 1/2″ wide to achieve this). The only difference is that I mitered the corners in order to reduce bulk.
Label: A special quilt calls for a special label. The pictures that were instrumental in the design really need to be kept with the quilt rather than being tucked away in a photo album. I also don’t know where this quilt will end up – maybe in a Senior’s Home? Some of the residents may be able to relate to this quilt in a special way.
In any case, if it is on display the story and the pictures should form part of the display. This is the label I ended up with. It has pockets (made from a clear tablecloth) for the pictures
It is free standing with hanging tabs – a set of buttons added close to the top/center means the label can be hidden away when desired; a set of buttons at the bottom means the label can be flipped and hung with the quilt.
The quilt is now finished. Even the label is done…. all before the dresses and clothesline have been appliqued on. We are saving that for the next post when there will be the Big Reveal.
* MistyFuse and Wonder Under are my preference because it is easier to hand stitch the binding, hanging rod and label through it. It is lighter weight than Steam-A-Seam and Heat & Bond, and doesn’t gum up your needle.
The dresses will be the star of the show. We will get back to them in the end, but now the real work of quilting begins.
The background needs to compliment – not compete – with the dresses. For that reason, I decided to use one piece of fabric and one colour of thread for the quilting.
I choose a piece of fabric that had a light line of gradation in the middle. That was the wrong spot. It would be better used to define the skyline, so I cut some fabric off the top and added it to the bottom. If in the end you can’t see the seam, I did a decent job of distraction.
My quilting sandwich consists of: the top fabric, a light weight batting, and muslin on the back. The stitching is done in 3 stages:
Stage 1 (Reference Points): this consists of a light stitching overall that will ensure the layers are kept together without being distorted once I get into the dense stitching. I marked the important reference points with chalk before stitching them – i.e. the tree line, the clothes line posts (this will be covered with appliqued posts later), and an outline of the road.
Stage 2 (Quilting Details): My plan of attack is to stitch the trees first, the 3 design elements next, then the road, the foreground grass, and finally the background grass.
Stage 3 (Balance): The third round adds additional detail where lacking. The trees may need more branches, the grass may need more detail. Each area is reviewed.
Most of the quilting is done in Stage 2. Here are excerpts.
Trees: are done free-motion. These were fairly simple – basically up and down, with some branches thrown in.
Tree line
The 3 design elements are next. They are the most high risk; I have to move from scribbles to something recognizable. If I can’t draw them on paper, how will I be able to stitch them on fabric?
To start, I take pictures of the original photos with my cellphone, and load them into the computer. Then I crop, resize and print them. Once printed, I can cut them out and mark the outline on fabric with chalk.
Car. The car didn’t have many details. After the outline was stitched, I added the door and tires simply by looking at the picture. Not perfect, but multiple passes of stitching gives you an opportunity to correct and cover some stray stitches.
car patterncar – end result
House. The house was more challenging. Not only did it have more detail, it was also facing away from the road. I wanted it reversed so I cut the paper copy into smaller sections and flipped them back side up. It is not an exact replica but recognizable.
House cut into pattern piecesmy house, reversed and stitched
Dog. This is a mischievous dog! He will be jumping up, nipping the clothes on the line, In fact, the plan is to use the torn red dress as proof. To get the right look for a dog, I found a line drawing.
Rex
Dense stitching in one area causes the fabric around it to pucker, but that can be corrected with more dense stitching. The end result? A lot of horizontal grass lines! I used a quilting ruler for reference and to keep the fabric in place while stitching.
Finished background
It’s too bad most of this picture will be covered up, but it is the backdrop I wanted. Parts of the road and grass will be visible in between the dresses. Hopefully, it will add interest to the piece.
But how should they be displayed? It could stay simple, but I felt it needed to say more.
Hankies are history. So are clotheslines. Maybe the background should also reflect something historical? A trip through my MIL’s photos helped me identify some elements I could use.
Their first car: a 1951 Pontiac SilverStreak.
Their ‘new’ house: a typical farmhouse.
The family pet: a dog.
A typical tree line in Northern Manitoba.
Many ideas considered. Many ideas discarded. The ones left were put to paper. Why?
It lets you know if the ideas will work overall
It gives you an idea of scale and placement
It determines the overall size of the piece
If necessary, the paper plan can be cut into pattern pieces
When you can’t draw and still want to make original art quilt, find ways around it. Simplify. Apply principles of design (i.e. balance, unity, proportion, rhythm, scale, contrast, and the Rule of Thirds). Draw on past experience (mistakes?). Use technology – anything it takes to move from concept to completion.
Here is the full size paper design I came up with. It’s pretty simple (notice that I did not say easy). A picture on top of a picture. The dresses (focal point) will be appliqued on at the end. They are drawn in overtop of the background because they determine the size and placement of everything else. The treeline is off centre. The design elements (rule of thirds) are top left, center right, and bottom (balance). The road provides unity and rhythm.
At this point, I don’t waste time on details (don’t you love the dog?!) but I DO start thinking about the quilting. The trees will be quilted with vertical lines, pebbles on the road will be circular, and the grass will be done with horizontal lines (contrast).
In the next post, I will attempt to move from scribbles to something acceptable.
“Before Kleenex” the note said. It was in my Mother-in-Law’s handwriting and placed inside a bag of hankies.
We were cleaning out her trunk, which included the hankies along with other Circa 1950 embroidered linens. For the quilting squeamish – skip over the next sentence. I cut (ouch. Yes, I did!) the linens and shared them with others. My intention was to make only one vintage quilt in her honour. It still has not been made. Instead…
Someone posted a picture of hankies folded like dresses, hanging from a clothesline. It was perfect! So very appropriate for my MIL.
Finding instructions* for folding the hankies was easy; ironing them was fun.
12 cute little dresses.
That was the easy part. Now what? One was torn. Will I use it?
In my next post, I will talk about the background.
*if interested, you can google instructions for making paper origami dresses. I watched a You-Tube video, following the instructions by using hankies instead of paper.
I spent time in Vancouver last week for Canada’s National Juried Show. What an inspiration!
It was a privilege to have two quilts (plus a challenge quilt) hanging in the show. You read all about The Circle Game – now “Game Over” as I made it. It placed third in the category for published patterns (by Jen Kingwell). If you were not on my blog at the time, enter Circle Game into the SEARCH box, and you will find a number of posts about it. It took 18 months to complete and was hand cut, hand pieced, hand embroidered, and hand quilted.
Game Over
But it is the Crooked Bridge that this post is all about.
The Crooked Bridge
It did not win an award, but the process of making it was interesting. It proves you can make landscape art quilts even if you don’t have ANY drawing ability. Do you want to try it?
First, select a photo with a strong focal point, and fairly simple landscape lines. I used a combination of two photos, in order to capture the entire bridge. For my bridge quilt, I did not want to simply duplicate photos (what fun is that?) and decided it should be fractured – in order to add interest, and illustrate different moods such as time of day, or seasons.
Print it (B&W is fine) as large as you can. Trace the outline of all the elements you want with a fine tip black pen – make some up, if you wish.
Enlarge the outline drawing (Staples will enlarge to a max of 12″ x 24″). Use it to determine where you want the fracture lines (i.e. where you want to make some colour changes). Also, number your pieces: each section A, B, C…; each piece 1, 2, 3…
At this point, my pattern pieces would have been too small to use, so I enlarged it to poster size at a local print shop. (note: quality of the print is not important, so the cost should be less – I paid $5 per copy). This is what my final drawing looked like (sorry for the wrinkles!).
You need to make 3 copies.
-One print will be taped to the wall for reference and fabric selection
-One print will become your pattern pieces, and
-One print will be used in putting the sections together
Spray mount the copy that will become your pattern pieces to poster board. (Note: If you need to join more than one piece of poster board, tape it together on the front side using tape that can withstand the heat of your iron.) Also, use a highlighter to mark the borders of each fracture section.
Working one section at a time, cut out the pattern pieces and select your fabrics. Outline the piece on the back of the fabric (I used lead pencil on the light fabrics and a white pencil on the darks). For any line with the highlighter, add 1/2″ seam allowance (SA). On all other lines, add 1/4″. Cut on the SA lines.
The following picture shows an example of one section, to be cut into individual pieces. (It should have had highlighter around the whole thing) I also marked the edges that would be placed on top of the one beside it with a dashed line.
Example of a Section
Then build each section separately. Leave border edges and any seam that will be background flat. For all seams that will be placed on top of another fabric, apply some Best Press to the edge (using a paint brush) and wrap around to the back of the pattern piece. Press flat. Use small dots of basting glue (I used Roxanne’s) to put one seam on top of another, paying attention to the 1/4″ SA
Once you are done building each section, use the 3rd enlarged copy to compare them to your fabric sections. There will be some normal distortion, so remark the border lines back to the original.
Now it is time to put it all together. Select a foundation fabric, big enough for the entire project. Sew or glue baste all the sections together, matching the shape edges.
Make a quilt sandwich. Machine applique every fabric shape and add additional quilting as desired. Here is what the back looked like before I covered it up. You can clearly see ‘Nipawin‘ from the back; it is more difficult to find on the front. There was some puckering – but blocking the quilt is magical!
back
Add embroidery or other embellishments if you wish. I wasn’t sure what to do with the tall grasses, but ended up hand stitching long lines with a variety of threads (in this pic you can see ‘Nipawin’).
I fused a fabric to the back and faced the edges.
Finally, add a label to your quilt, with original pictures and the quilt story. In the end, I may donate this quilt to the town of Nipawin to be placed in a public space. It deserves to live where it is appreciated.
I hope some of you will give this technique a try. If you thrive on challenges and enjoy puzzling, you should like it.
Note: my instructions are a modified version of Fractured Landscape Quilts by Katie Pasquini Masopust. (this book is in the library for those that are Manitoba Prairie Quilt members)
When buying bedding, most people coordinate all the pieces.
That’s what I had in mind for this quilt.
Option 1
It started with a fat quarter bundle (Geometry by Janet Clare), a contrasting colour (gold) and lots of neutral yardage – mostly navy and beige.
The top was first. The pattern: “Bird’s Hill” by The Blanket Statement. She is a local pattern designer, and I like to support local. How about that, I actually followed a pattern.
The quilt is reversible. I have always liked the ‘bed runner’ look – this one is built in. I usually use up extra fabric in the backing. You can see that the pillowcases are also reversible.
Option 2
Who doesn’t need a perfectly well behaved pet? Meet Angel. This one will live up to her name. The pattern: ‘Patch the Pussycat’ by funky friends factory.
Angel
The Dream pillow was added just for fun. I have been buying Blooming Bias strips for sometime but this was the first time I used them. It was easy and adds some nice texture. The pattern: Dream Pillow #C-740 by Chenille-It.
Pleasant dreams
The Cat and Pillow didn’t use nearly enough scraps. The original plan was to make regular plain pillowcases but I made these instead. They look like shams but they are pillowcases and they did a great job of looking after scraps!
pillow cases – front and back
I keep some pre-quilted fabric on hand just for this purpose (bought only when it is on sale). Yes, you could make your own, but this is just so easy to use.
pre-quilted fabric
For the front, I cut:
Center: 21″ x 14 1/2″ pre-quilted fabric, and the same size quilt fabric, plus enough 1 1/2″ strips of navy to go around al 4 sides.
Top & bottom: 3″ x 21″ pre-quilted fabric and lots of scraps
two sides: 4″ x 18 1/2″ pre-quilted fabric and more scraps
In the center piece, I simply laid the fabric on top and then used a zig-zag stitch to sew them together. Working from the back, I followed every other line on the pre-quilted fabric. Then I added the strip of navy fabric to each edge in a Quilt-As-You-Go (QAYG) method.
The border strips were all QAYG improv. Whatever you have, you can use. I then sewed the top and bottom pieces to the center, and added the sides. Here is a close up.
The pre-quilted fabric for the back was cut 18 1/2″ x 27″ and was all done QAYG. What I used, and where it was placed was determined by which piece was long enough. By this time, I was tired of working with small pieces and decided to use them as they were.
The back and front were then sewn together. I made a lining for the inside of the pillowcase so that the seams would not be noticeable. Another option would have been to add a binding around the open end. (Note: the measurements given may not be precise. I like to have extra space for trimming)
I am very happy to put this project behind me, and move on to another!
Flags contain symbols. They represent association and relationship such as love and loyalty. To put one on display ensures they will be thought of every time you look at it.
I have considered making them for the special people in my life for a number of years, but they were never a priority until now. Inspired by the work of others, I made a payer flag for Ukraine. It is very simple but a number of people asked for the pattern, so it is being provided here.
Cutting:
Variety of yellow strips 1 1/2″ by 7″
Variety of 1 1/2″ blue strips
One 6 1/2″ white square
Three 3″ white squares
Two white strips 2″ by 12 1/2″
Two white strips 2″ by 16 1/2″
Backing fabric approximately 16 1/2″ square
3″ strip of backing fabric, 16 1/2″ long
Step 1: Make two Yellow/White Half Square Triangles (HST)
Strip piece six pieces of yellow fabric. Iron all seams up, trim to 6 1/2″ square and cut diagonally into 2 pieces. Option A uses both of these pieces.
Option A
For Option B, repeat the strip piecing process, iron seams down, and cut diagonally the other direction. You will use one piece of each strip set.
Option B
Make 2 HST’s, one with the yellow on the left, and one with the yellow on the right side. Sew them together, matching up the seams.
Step 2: Make a blue/white rectangle
Start with one of the 3″ squares, adding blue strips to only two sides of the square, log cabin style. Refer to the following diagram for length and strip placement.
Trim to 6 1/2″ X 12 1/2″.
Add a 3″ square to both top corners. Mark diagonally, and stitch along the marked line. Trim to 1/4″ seam allowance (SA)
Add corners
Sew top and bottom together, lining up the center of each. Trim sides to match, if necessary. Add the shorter border strips to the sides, and the longer border strips to the top/bottom.
Add borders
Step 3: Quilting/Binding
I did not want the stitching to show on the back of the flag, so only quilted through the top and batting. Quilt as desired. Outline the heart with big-stitch embroidery or if hand stitching isn’t your thing, use the triple stitch on your machine. If you quilt through all 3 layers, then bind in your usual way and add a hanging sleeve. Otherwise…
Square up and trim to your desired size PLUS 1/4″ on all four sides. Cut your backing fabric the same size. Sew front and back together (right sides together) on both sides and bottom but leave the top open. Clip the bottom corners and turn right side out. Push out the corners and give the flag a good pressing.
Take the 3″ strip of backing fabric and iron both short sides, making the strip the very same length as the top seam of the flag. Stitch or use some fusible web to tack down the sides. Also iron one edge of the strip by 1/4″ (this will make hand stitching the bottom of the hanging sleeve easier).
Line the raw edge of the strip to the top of the flag RST. Stitch.
Iron up and around the edge. Stitch-in-the-ditch along the edge (through all 3 layers and the hanging sleeve at the back). Hand stitch to close sight of the seam on both sides, and along the bottom edge of the hanging sleeve.
Insert a dowel or string for hanging. You are done!
So… I may have missed posting on this blog for over a year, but we won’t get into that now. Instead of talking about the never ending Covid saga, or reviewing my quilting expeditions of the last 2 years, lets move on. After all, you just might see some of the same quilts from 2 years ago make another appearance!
February is Heritage Month in our guild. In previous years, there was little I could relate to. My ancestors did not piece quilts with beautiful designs or make quilts that I could proudly display as 100 year old vintage quilts. It was ALL about function. They had to be warm. Super warm. I grew up in houses without central heat (a big deal in the Canadian prairies). The first person to get up in the morning would make a fire in the wood stove, and gradually the air around the stove would heat up. Vents in the floor would bring a little heat up to the second floor. Mostly, you would just stay under your quilt as long as you could!
Then, last summer I came across a carding drum while cleaning out the house of my in-laws. I remembered using one as a child.
A little deeper into the dive, I came across 3 quilts. All of them were double the width of fabric, similar to the one pictured below (approx. 80×90″). The same kind of quilts I grew up with. Never used. I offered them to family. No one wanted them. I have more quilts than I need or have room for, but I just couldn’t bring myself to donate them to the local second hand store.
Some research on making wool quilts took me to a series of Doukhobor articles. They sounded very much like the quilts I grew up with, and the quilts I had in front of me. I began to wonder if these quilts reflected culture. My background (Mennonite), my in-laws (Ukrainian), the Doukhobors all came from Western/Southern Russia. Or maybe it reflected geography? After all, raw wool from sheep is far more accessible in rural areas, than in cities. An informal FB survey confirmed the idea that many different cultures made similar wool quilts. They are seldom talked about; certainly, never highlighted.
With this in mind, I approached the guild about the possibility of making a video for Heritage month. Unfortunately, this site does not allow me to post video’s, so I will proceed with pictures.
Wool: Wool quilts are all about the wool so let’s start right there – with some raw wool. My mom bought bags and bags of wool for her quilts and it always contained a lot more than just vegetable matter! To wash the wool, it can be soaked overnight in a detergent such as Dawn, rinsed and drained as much as possible. All of this has to be done without agitation. Then it is spread on window screens (or plant trays) and left outside to dry.
Raw wool as you buy it
The clean wool still contains vegetable matter. Most of that will come out through the use of the hand carding paddles. The paddles also line up the wool fibers.
Wool, washed but with vegetable matter
The wool I used for the demo was recycled from an old quilt we had taken apart, similar to what our foremothers would have done. The wool was in very good shape, although fairly matted. You can see the quilting lines, and cotton fibers.
Wool from a quilt we used in the past, to be recycled
It took considerable effort to pull the fibers apart. This was done with a pet comb. I have no idea what our grandmothers used!
Wool after being washed and pulled apart
These clumps were put through the carding drum several times. The end result was still a lofty batt.
Wool batt off the drum
Batting: Wool batting for the quilt is made by placing individual wool batts from the carding drum in-between two layers of cheesecloth. (I used cheesecloth from the quilt I took apart, as it was still in very good shape). Individual wool batts are placed beside each other, slightly overlapped. Multiple layers are added until you have a thickness of 2 to 2 1/2″, with each layer going in the opposite direction (I did 3 layers). Can you imagine how many individual batts would have to be made for the whole quilt?
The Doukobours then hand basted the batting together so that it could be inserted into the quilt top/back prior to quilting. The batting of the quilts I have were not basted.
wool batts layered and put in between layers of cheesecloth
Construction: In my childhood, each child received their wool quilt in the early grades, and it was expected to last until you left home. (Upon graduation, we received a pieced quilt from the church ladies. Mine was the bow tie pattern done in white and pastel colours made of Fortrel). My wool quilt was tied, and the edges topstitched with a treadle sewing machine.
The wool quilts I have here were hand quilted with purposeful large stitching, simply so that it was easier to take them apart and recycle the wool. I am assuming the wool batt was not basted for the same reason.
quilting stitches
The front/back edges were topstitched after the quilting was done.
edges topstitched
Fabric: Initially, I thought these quilts were made in the 1970/80’s. Now, I think it was earlier. My Father in-law thinks they were made in the 1950’s. Having done a little research on dating fabrics, I do think it was prior to 1970. Fabrics in the 1960’s was bright and bold (similar to the backing?). Fabrics in the 1970’s were primarily rusts and browns. If anyone knows more about fabric dating, I would love to hear from you.
3 quilt fabrics
Care: These quilts were hung outside on the line to air out but never washed. A duvet cover was made so that the quilts could be kept clean.
A Step further: It’s in my nature to explore. Now that I have a fair bit of wool to recycle, I couldn’t help but think – What if I put yarn with the wool through the carding drum? Could I add string or thread? Here are initial results.
Recycled wool with yarn and thread
It was fun to play. Not sure what I will do with it. Once spring comes (if ever!), I think I will start with felting these batts and see what happens.
How did June end up so busy? Maybe it was the luxury of NO commitments through the period of social isolation that suddenly made one appointment or one activity in a day feel busy.
The next question is – how many masks or PPE did you make? It would be interesting to know what the collective count of all of our efforts would be. My contribution, moderate compared to many, was 56 masks and 6 scrub hats.
Besides masks, June found me finishing a challenge, testing a pattern, and starting 2 quilts for the grandsons.
One at a time…
The Challenge I finished was the ‘Diana’ Challenge being hosted by Cherrywood Fabrics. The time frame has now been extended so although I worked hard to finish by the initial deadline, I will refrain from showing pictures at this time. But its not too late for you. Check it out. It might interest you!
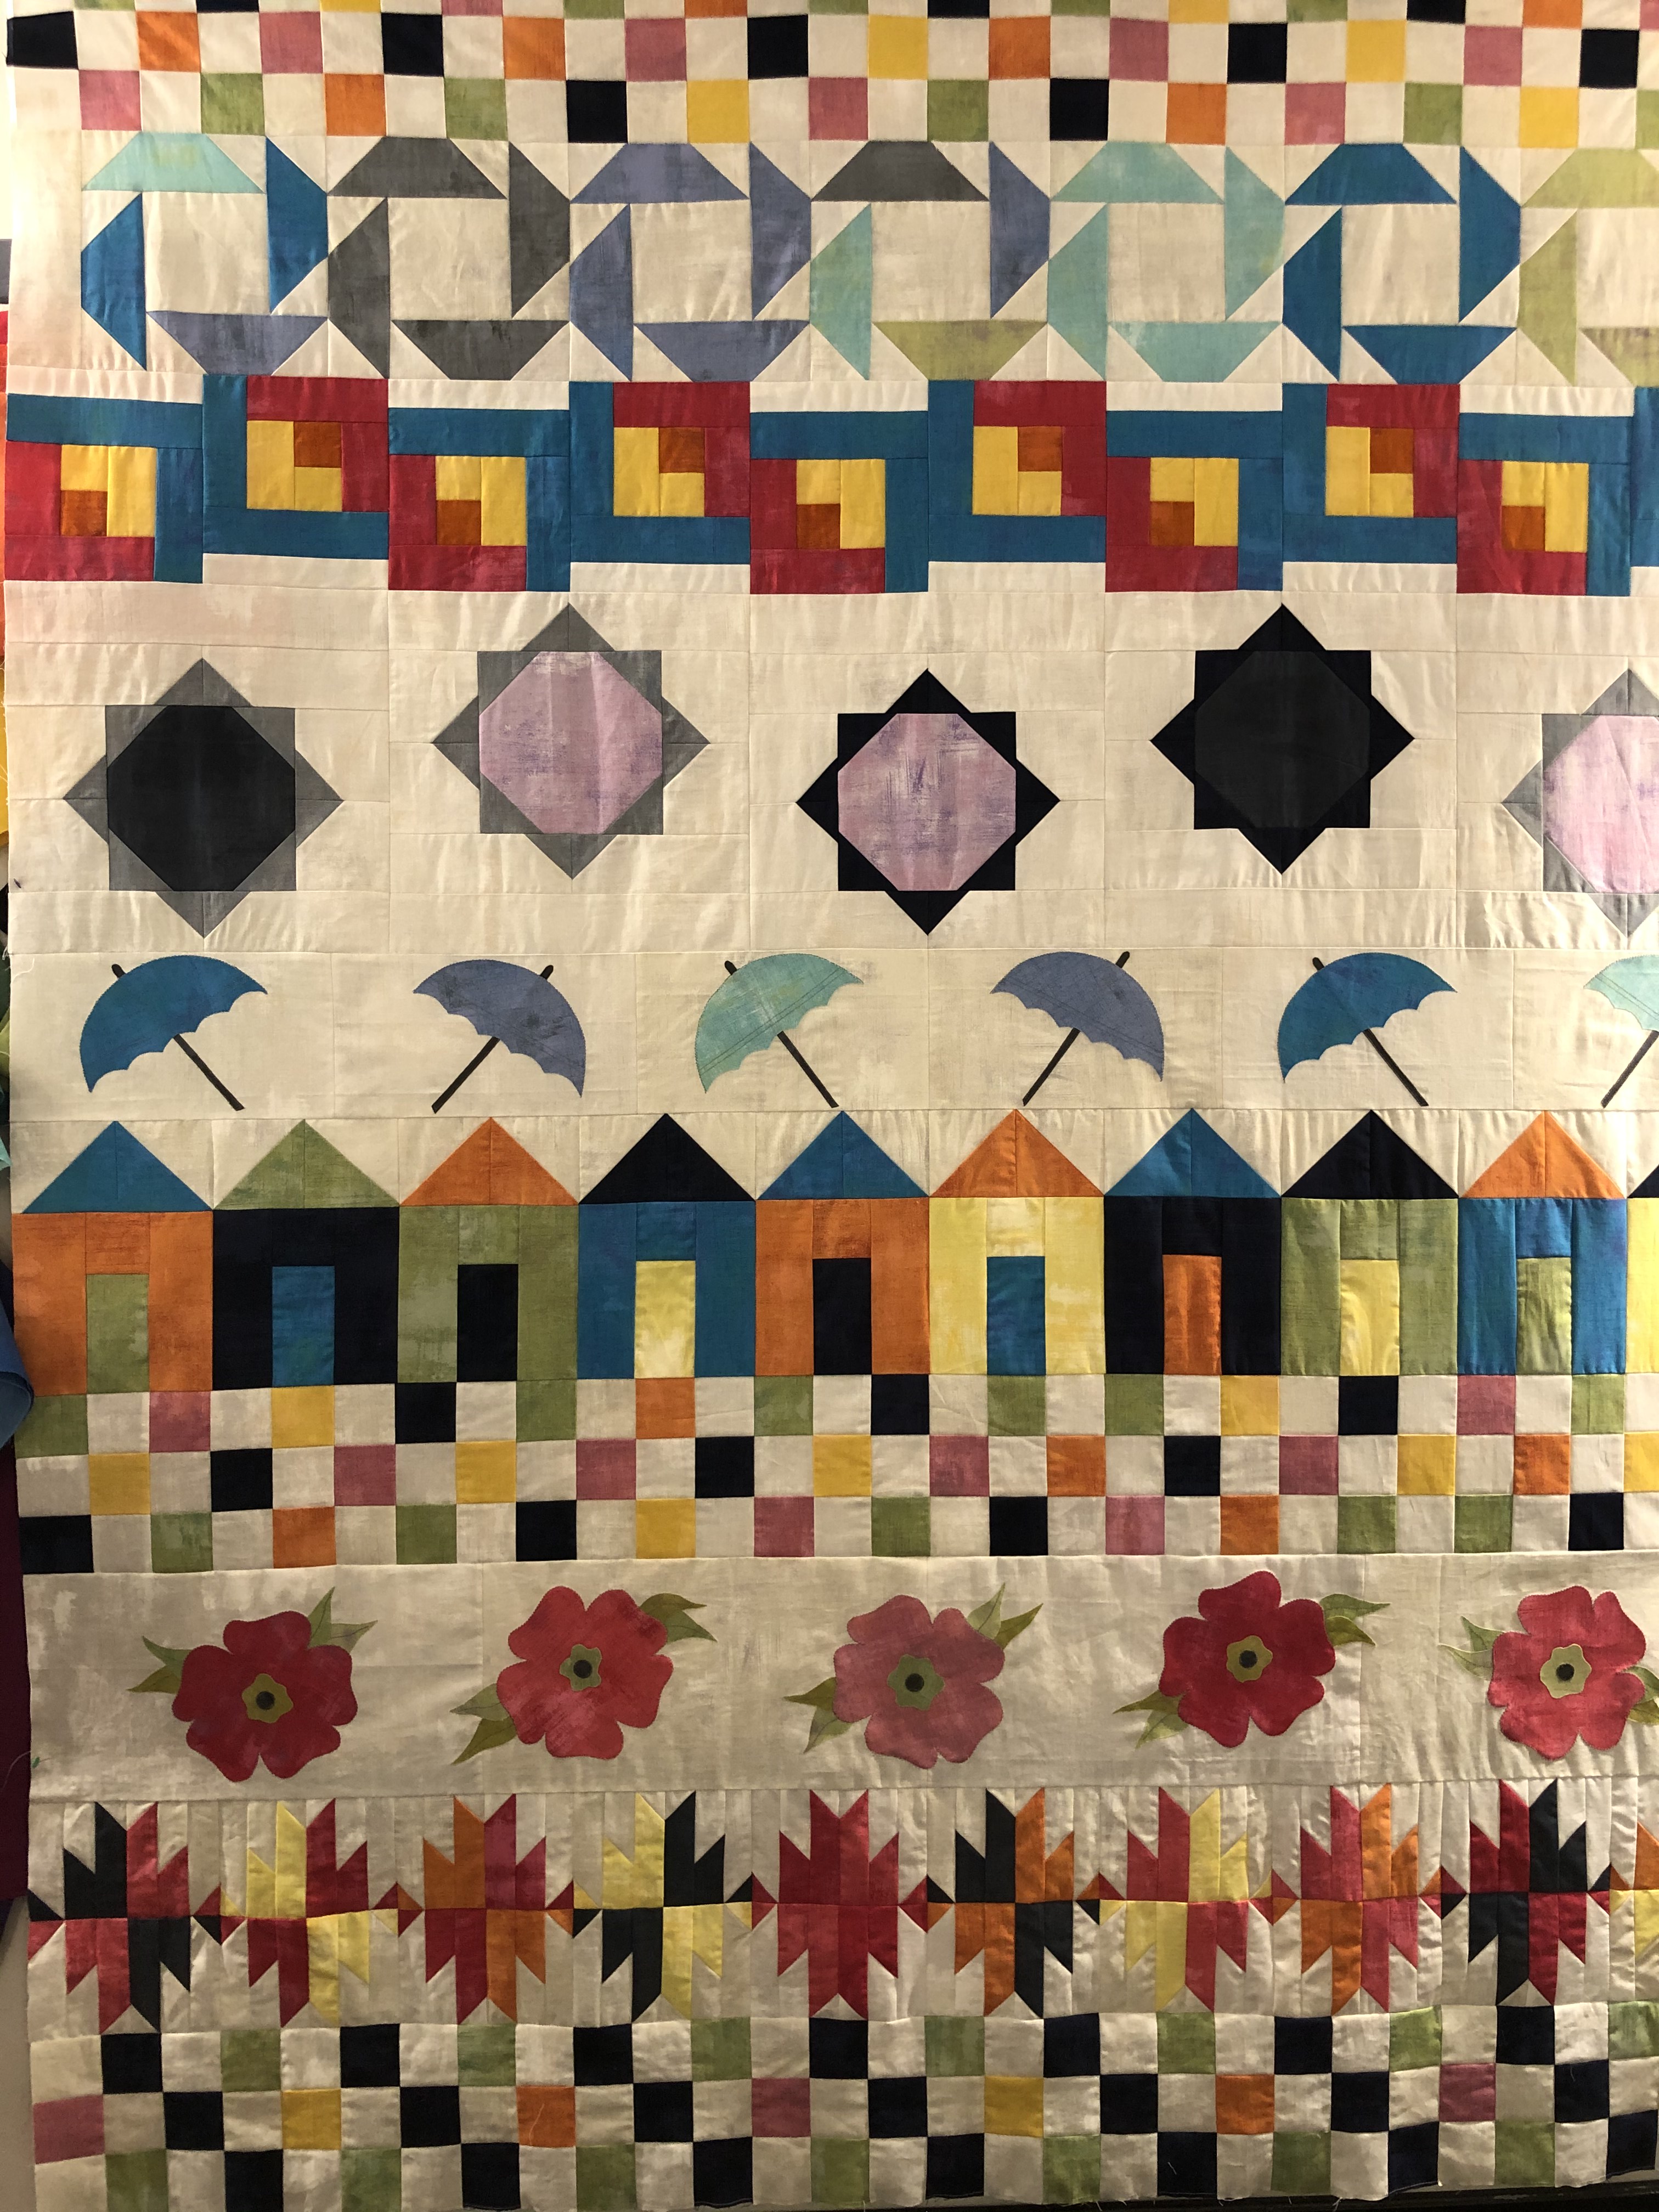
Pattern testing was a first, and it was fun. This is a Row of the Month pattern designed by Marj Moore that will be available through Design Wall come September. The fabric and pattern for one row will be made available every month for 8 months. Here is a peak – row by row.
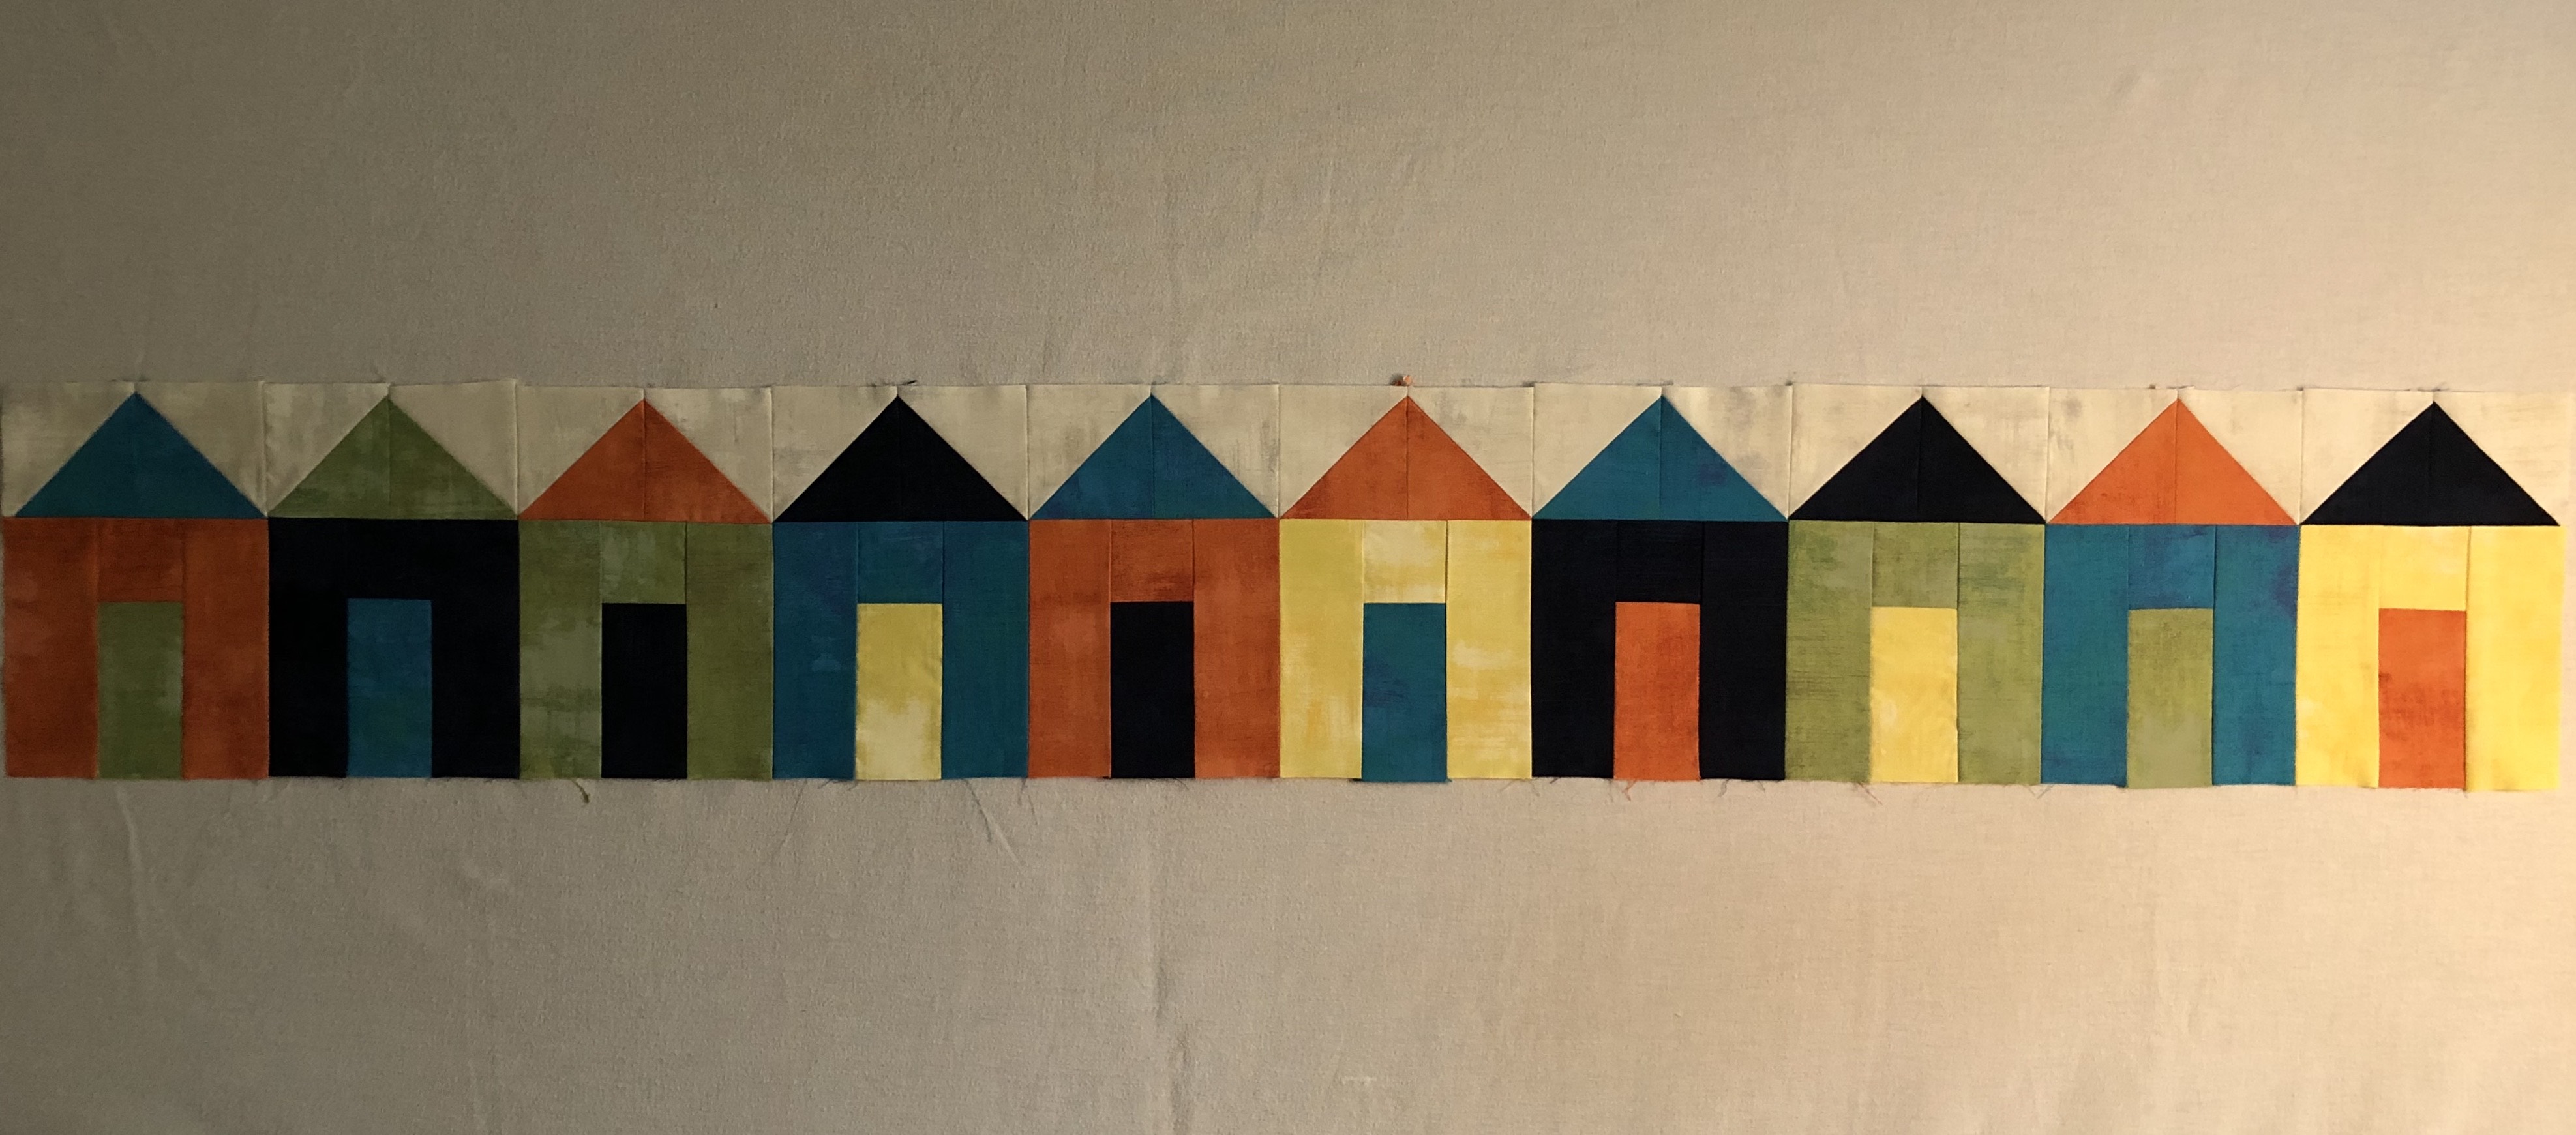
Row 1: I have always wanted to do a quilt with houses on it.
Row 2: A fairly simple flower that can be done as raw edge applique, or needle turned.
Row 3: A pieced flower. I really liked this one.
Row 4: Another appliqued row that add a soft touch to the quilt
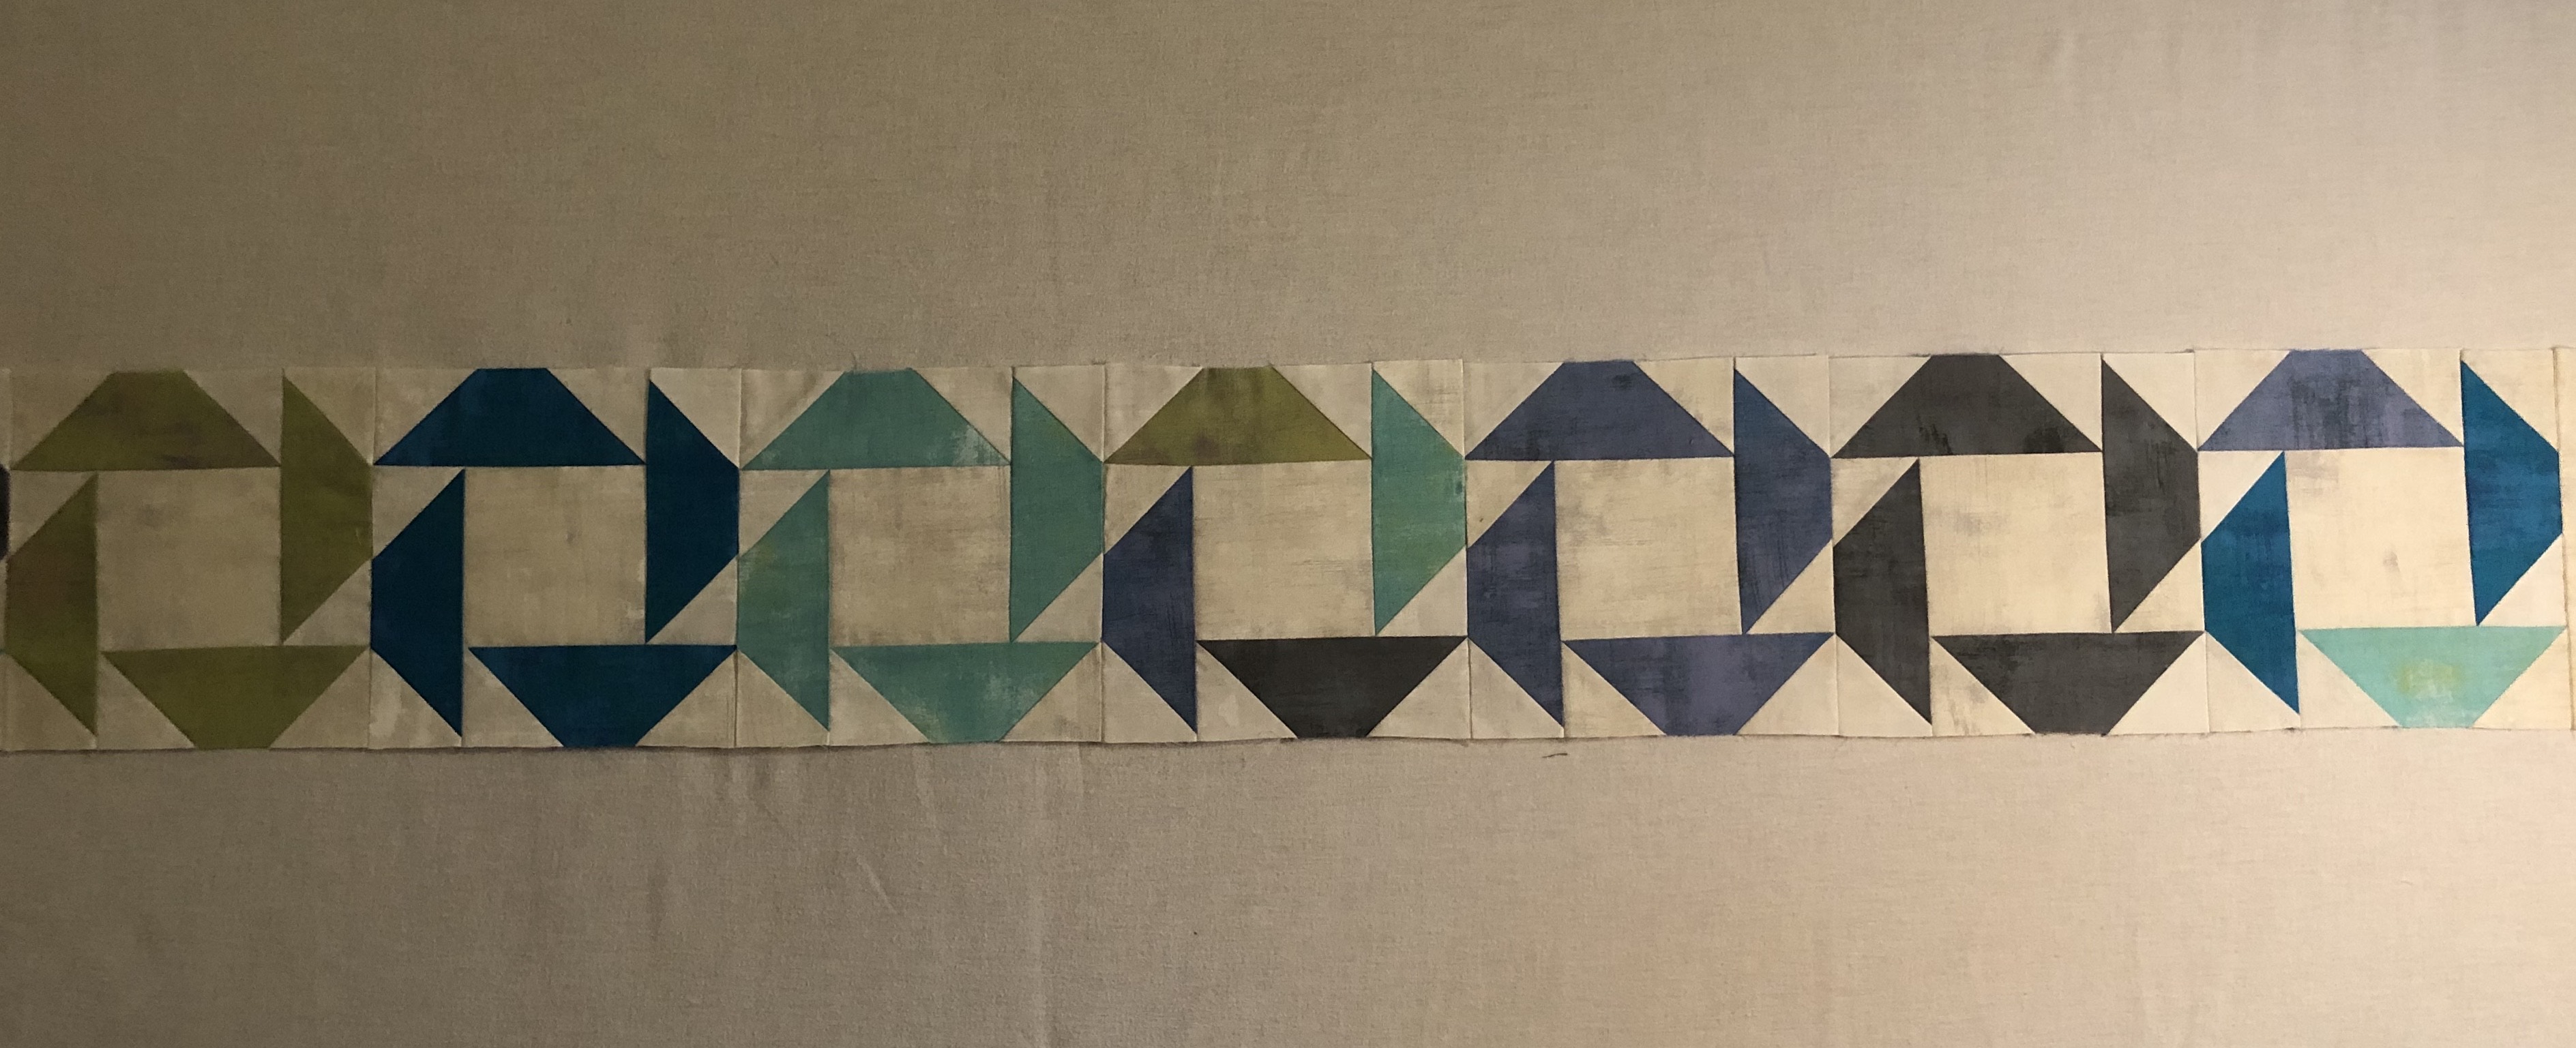
Row 5: A variation on a log cabin that looks really different from a normal log cabin block.
Row 6: A lot of work, but definitely worth it! This is my favorite.
Row 7: Another row that is very different, but not difficult.
Row 8: A traditional checkerboard row that ties it all together.
If you would like to do this quilt, send Simone at Design Wall a message and get your name on the list. Your quilt will look different than mine, but here is the grand reveal…
Quilts for the grandsons will be done for their birthdays (August). Or Christmas (year to be determined). Both are hockey themed quilts -the same but different. Similar enough to avoid competition; different enough to tell apart.
The time has come for me to make a decision concerning this blog. Do I want to continue, or don’t I? Do I want to pay for an updated site (more options), or not? Either way, WordPress is changing the way it functions so no matter what, things are changing. By the end of the summer, I will decide. Have a great one!